These ones are what I made before, so they are a bit old, But still useful :)
selectSnap
https://drive.google.com/file/d/0B77RQxzB7Z2aZmZuWl9uMjlFZ2s/view?usp=sharing
nodeShift
https://drive.google.com/file/d/0B77RQxzB7Z2aVF81amhWaTdmTFk/view?usp=sharing
backDropSelector
https://drive.google.com/file/d/0B77RQxzB7Z2aamVhd1ZkMTdzbHM/view?usp=sharing
2016-06-01
dotsMod + aimForTheTop(2016/06/02 updated)
dotsMod(2016/06/02 updated)
https://drive.google.com/file/d/0B77RQxzB7Z2aNUpKdjU0eHdfYzQ/view?usp=sharing
new:2016/06/02
aimForTheTop
https://drive.google.com/file/d/0B77RQxzB7Z2aM3BrN0Nld2lRUnc/view?usp=sharing
https://drive.google.com/file/d/0B77RQxzB7Z2aNUpKdjU0eHdfYzQ/view?usp=sharing
new:2016/06/02
aimForTheTop
https://drive.google.com/file/d/0B77RQxzB7Z2aM3BrN0Nld2lRUnc/view?usp=sharing
2016-05-29
node graph tidy up tools
nodeScaler.py
https://drive.google.com/file/d/0B77RQxzB7Z2aeDU4cmpYUUpNMnc/view?usp=sharing
https://drive.google.com/file/d/0B77RQxzB7Z2acWY2bXdzTlZyYWs/view?usp=sharing
https://drive.google.com/file/d/0B77RQxzB7Z2aMm1OOFF6TWJBRlE/view?usp=sharing
2016-02-10
PrefとPworldからデフォームアニメーションするジオメトリの特定の点の座標を求める(ただしそれは、画面上に常に見えている)
デフォームアニメーションしているジオメトリの特定の点の座標をPrefとPworldから求める方法をきかれたので、ココにメモしておきます。まぁまぁニッチです。
ちなみに、mayaでPoint Constraint(Point on Poly)でやるのが一番よさそうです・・・
ただ、PrefとPworldからそれが出来ると、ディスプレイスメントが施されてレンダリングされたものでも求めることができるってメリットがあります。
PworldとPrefが下の感じです。
Prefはデフォームしているジオメトリでもreference poseでのpworldが出力される優れものです。Vray, mtoa, RISだとデフォルトで出力可能なAOVです。他のレンダラは調べてないので、ちょっと分かりません・・・
まずは、Prefをつかって、特定の点がスクリーン座標上でどこを通るか求めます。
Prefのカラーはジオメトリにへばりついているので、特定の点はPref上では、常に同じRGB値になります。ここではそれが、(0.49121, 10.54687,1.92187) だったとします。
そうすると、この点から、Pref上の各ピクセル(rgb)までの距離は
√((r - 0.49121)^2 + (g - 10.54687)^2 + (b - 1.92187)^2)
となります。これをExpressionノードで再現すると・・・
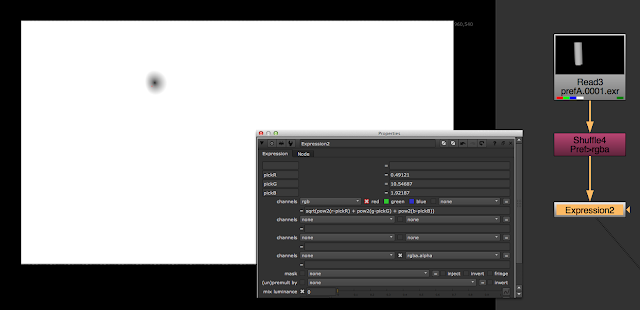
こんな感じです。
ちなみに、
とちゃんと同じ点にへばりついてるのが確認出来ます。
使いづらいので、これを1からマイナスしてクランプしました。
これをCurveToolを使って明るさが最大値のピクセルを追いかけます。
上で述べた「まずは、Prefをつかって、特定の点がスクリーン座標上でどこを通るか求めます」に当たります。
さっきのExpressionノードではRチャンネルのみをしょりしたので、shuffleとか使って、全部完全に白黒画像にしています。r r rです。

こんな感じで、CurveTool加えて、Max Luma Pixel で [Go!] です。
そうすると、
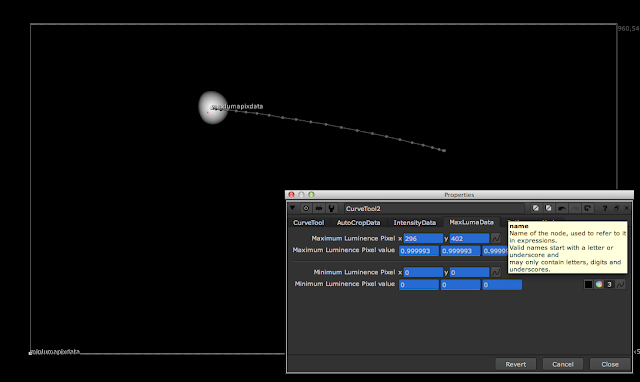
こんなです。
これで、ジオメトリ上の特定の点がスクリーン座標上のどこを通ったかが分かったので、この2D座標をつかって、Pworldのカラー(rgb)をサンプルすると、そのrgb値がそのまま、その特定の点が通る(x,y,z)となります。
サンプルする方法は、tclの
[sample node channel x y]
を用いるか、pythonの
nuke.sample(node, 'channel', x, y)
になります。簡単なのは、Axisだしてtclでtranslateに上のエクスプレションをはれば一応にくるんですが、nukeはこの手のエクスプレッションを毎フレーム評価するのが結構苦手です。
なので、そういう場合は毎フレーム計算実行するノードでかつpythonタブのついているもので、そのpython使って毎フレームAxisノードに座標をsetValueしていくのが回避策とされてます。CurveToolハックと呼ばれる手法です。
CurveToolが2回でてきているのでややこしいですが、今回のはpythonを毎フレーム実行してAxisノードのtranslateにsetValueするためのモノです。
Axisノードと新たに、CurveToolを作って、
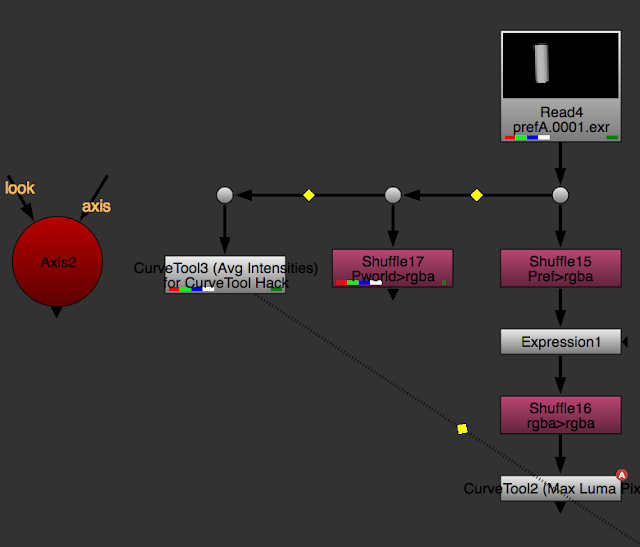
CurveToolのpythonタブの[before each frame]にAxis2のtranslateに、Pworldの特定の点をsampleして得た値をsetValueするようなpythonを書きます。
nuke.toNode("Axis2")['translate'].setValue([r,g,b])
って具合です。[r,g,b]のところはコードが長いので、下記のように展開します。
[r,g,b] のところはたとえば実際にはrを書いてみると・・・
nuke.sample(nuke.toNode(Read4"), "Pworld.red", parent.CurveTool2.maxlumapixdata.x, parent.CurveTool2.maxlumapixdata.y)
この場合だと、nuke.toNode(Read4"), "Pworld.red" の代わりに、Shuffle17を使って、
nuke.sample(nuke.toNode("Shuffle17"), "red", parent.CurveTool2.maxlumapixdata.x, parent.CurveTool2.maxlumapixdata.y)
でも可能です。チャンネルは""でくるむ必要があるので注意を。rgbaは省略できます。
これをあとg,b分かいて、[]でくるんで、setValue()の中に入れます。
また、Axis2のtranslateには、アニメーションさせるため予め適当なフレームで「空(から)キーフレーム」を打っておきます。
これで、CurveTool3の[Go!]すると、
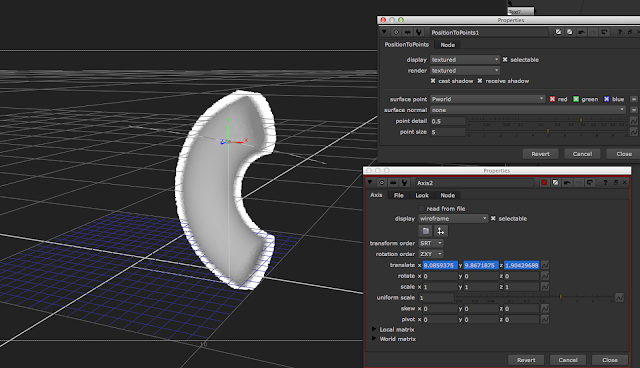
ってな感じでAxisのtranslateで特定の点の座標を得ることができます。
実際には、こんなこと毎回するの面倒なので、ツール化するのが良いと思います。
これらをひとまとまりでやると、他では使えないツールになるので、前半と後半と分けてツールにするのが良いかと。実際ボクは前半部分はツール化したものを割と使っています。後半は、結構ニッチなのと、mayaから持って来た方が確実なので、そこまでやったことは無かったです:)
ちなみに、mayaでPoint Constraint(Point on Poly)でやるのが一番よさそうです・・・
ただ、PrefとPworldからそれが出来ると、ディスプレイスメントが施されてレンダリングされたものでも求めることができるってメリットがあります。
PworldとPrefが下の感じです。
 |
| Pworld |
 |
| Pref |
Prefはデフォームしているジオメトリでもreference poseでのpworldが出力される優れものです。Vray, mtoa, RISだとデフォルトで出力可能なAOVです。他のレンダラは調べてないので、ちょっと分かりません・・・
まずは、Prefをつかって、特定の点がスクリーン座標上でどこを通るか求めます。
Prefのカラーはジオメトリにへばりついているので、特定の点はPref上では、常に同じRGB値になります。ここではそれが、(0.49121, 10.54687,1.92187) だったとします。
そうすると、この点から、Pref上の各ピクセル(rgb)までの距離は
√((r - 0.49121)^2 + (g - 10.54687)^2 + (b - 1.92187)^2)
となります。これをExpressionノードで再現すると・・・

こんな感じです。
ちなみに、
 |
| 分かりやすく色つけてます |
とちゃんと同じ点にへばりついてるのが確認出来ます。
使いづらいので、これを1からマイナスしてクランプしました。
 |
| Rチャンネルのみ表示の結果 |
これをCurveToolを使って明るさが最大値のピクセルを追いかけます。
上で述べた「まずは、Prefをつかって、特定の点がスクリーン座標上でどこを通るか求めます」に当たります。
さっきのExpressionノードではRチャンネルのみをしょりしたので、shuffleとか使って、全部完全に白黒画像にしています。r r rです。

こんな感じで、CurveTool加えて、Max Luma Pixel で [Go!] です。
そうすると、

こんなです。
これで、ジオメトリ上の特定の点がスクリーン座標上のどこを通ったかが分かったので、この2D座標をつかって、Pworldのカラー(rgb)をサンプルすると、そのrgb値がそのまま、その特定の点が通る(x,y,z)となります。
サンプルする方法は、tclの
[sample node channel x y]
を用いるか、pythonの
nuke.sample(node, 'channel', x, y)
になります。簡単なのは、Axisだしてtclでtranslateに上のエクスプレションをはれば一応にくるんですが、nukeはこの手のエクスプレッションを毎フレーム評価するのが結構苦手です。
なので、そういう場合は毎フレーム計算実行するノードでかつpythonタブのついているもので、そのpython使って毎フレームAxisノードに座標をsetValueしていくのが回避策とされてます。CurveToolハックと呼ばれる手法です。
CurveToolが2回でてきているのでややこしいですが、今回のはpythonを毎フレーム実行してAxisノードのtranslateにsetValueするためのモノです。
Axisノードと新たに、CurveToolを作って、

CurveToolのpythonタブの[before each frame]にAxis2のtranslateに、Pworldの特定の点をsampleして得た値をsetValueするようなpythonを書きます。
nuke.toNode("Axis2")['translate'].setValue([r,g,b])
って具合です。[r,g,b]のところはコードが長いので、下記のように展開します。
[r,g,b] のところはたとえば実際にはrを書いてみると・・・
nuke.sample(nuke.toNode(Read4"), "Pworld.red", parent.CurveTool2.maxlumapixdata.x, parent.CurveTool2.maxlumapixdata.y)
この場合だと、nuke.toNode(Read4"), "Pworld.red" の代わりに、Shuffle17を使って、
nuke.sample(nuke.toNode("Shuffle17"), "red", parent.CurveTool2.maxlumapixdata.x, parent.CurveTool2.maxlumapixdata.y)
でも可能です。チャンネルは""でくるむ必要があるので注意を。rgbaは省略できます。
これをあとg,b分かいて、[]でくるんで、setValue()の中に入れます。
また、Axis2のtranslateには、アニメーションさせるため予め適当なフレームで「空(から)キーフレーム」を打っておきます。
これで、CurveTool3の[Go!]すると、

ってな感じでAxisのtranslateで特定の点の座標を得ることができます。
実際には、こんなこと毎回するの面倒なので、ツール化するのが良いと思います。
これらをひとまとまりでやると、他では使えないツールになるので、前半と後半と分けてツールにするのが良いかと。実際ボクは前半部分はツール化したものを割と使っています。後半は、結構ニッチなのと、mayaから持って来た方が確実なので、そこまでやったことは無かったです:)
2015-07-05
secret of IBK
There are some nice tutorials about IBK in the following link,
http://compositingmentor.com
This is pretty much amazing! Thank you pretty much, Tony.
IBK node which IBK Colour and IBK Gizmo have it inside themselves can be broken down into the following formula.
alpha = (Ag-Ar*rw-Ab*gbw)<=0?1:clamp(1-(Ag-Ar*rw-Ab*gbw)/(Bg-Br*rw-Bb*gbw))
A is pfg and B is c. and this is the the case of "Green" keying, I mean we choose "Green" on IBK.
rw is the value of "red weight" and gbw is the value of "green/blur weight".
So, When preparing clean plate with IBK Colour, we need to tweak the value of the "darks" and the "lights" on itself. The "darks" is the "offset" of the Grade node which affects on input plate in IBK Colour. The "lights" is the "multiple" of the Grade node as well.
Anyway, we compare green and red + blue. If the pixel goes "green > red + blue", the pixel would be remained. Or if the pixel goes to "green < red + blue", the pixel would be turned to black. I mean IBK Colour-wise.
When the green in the green screen looks saturated, I usually take the red or the blue value of "lights" up.
When the green in the green screen doesn't so saturated, I usually take the red or the blue value of "lights" down. This is the case of Green screen.
 |
| the top node(IBK Colour) of IBK Stack, this is the case of "Saturated" |
 |
| the top node(IBK Colour) of IBK Stack, this is the case of "Less Saturated" |

the clean plate which is the resulted of IBK stack.
 |
| checking for key extract |
And "use bkg luminance" on "IBK Gizmo" works like "Additive Keyer"
See http://www.nukepedia.com/written-tutorials/additive-keyer/
This is also awesome great tutorial.
(CC) Blender Foundation | mango.blender.org
2015-03-02
operationChanger
I would like to share operationChanger.py I just made.
operationChanger.py
The function is like this,,,
operationChanger.py
The function is like this,,,
2015-01-28
lerp()
expression でlerp()ってがある。
任意のアニメーション(curve)のfitコマンドみたいなものみたい・・・
既に、アニメーションがついているknobに対して、
lerp(30, f(30), 90, f(74), x)
とかってやると、既についていたアニメーションの30フレーム目を起点に、74フレーム目の値を90フレーム目に持っていく→74フレーム目の値を90フレーム目にシフトする用に補完し直す。って感じ。
y = f(x) のつもりです。この場合xが時間軸、yがその値。
lerp([python nuke.thisNode().knob('rotate').animation(0).keys()\[0\].x], curve([python nuke.thisNode().knob('rotate').animation(0).keys()\[0\].x]), [python nuke.toNode('FrameHold1').knob('first_frame').value()], curve([python nuke.thisNode().knob('rotate').animation(0).keys()\[1\].x]), x)
Subscribe to:
Posts (Atom)